Automated Power Apps Solution Extraction to DevOps Git
Introduction
As the Microsoft Power Apps & Dynamics 365 scene continues to evolve at a dramatic pace, the onus on developers, consultants and operations teams to implement more Agile, efficient ways of deploying their configuration & customisation is ever increasing.
Whether your client is new to the Power Apps cloud ecosystem or in the process of moving legacy, on-premise D365 applications to the cloud; there is an expectation to mirror the speed and flexibility of Microsoft’s more fluid, incremental update system for the core Common Data Service platform.
Historically this has been achieved via Microsoft’s suite of dedicated SDK tools, primarily Solution Packager, Deployer & Configuration Migration, in complement with more targeted community tools such as Wael Hamze’s excellent [XrmCiFramework] and more recently, Microsoft’s own [DevOps extensions].
But how can we use each of these components in a way that is extensible, stable, repeatable and auditable? In this article we’ll be exploring a solution to get your configuration & customisation out of CDS and into your DevOps Git repo, pushing the changes to a new branch and raising a Pull Request (PR) for the development team to review. In doing so we mitigate any risk in allowing the pipeline to automatically push changes to the master branch.
Set up your Git repo
Before we can extract our Power Apps configuration we need somewhere for it to go. I will assume you will have a target DevOps project in mind, otherwise you can find some helpful documentation from Microsoft to get started here.
For our DevOps build agent to effectively achieve this, it needs to be granted some additional permissions.
Navigate to your project’s Repository settings under Project Settings in DevOps (my repo’s name is cds-devops-vcs).
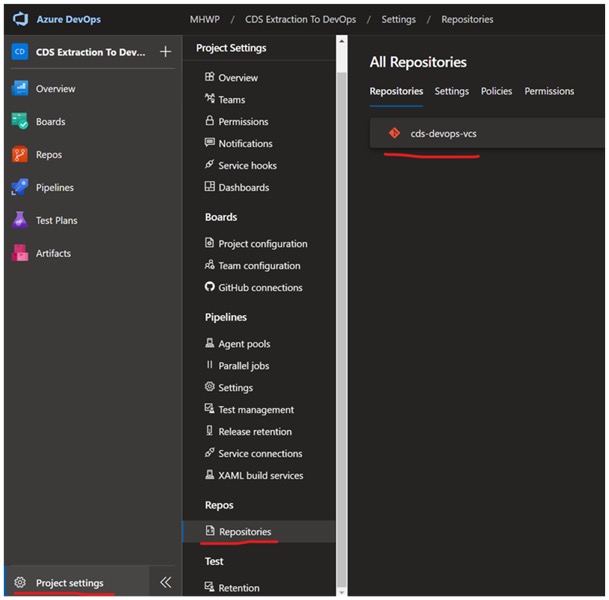
Click your repository (DevOps can support multiple repos per project), and open the permissions tab.
Locate the Build Service Account under your user’s section (it is system generated and will have the form <Project Name> Build Service <Organisation Name>)
Grant it the following permissions:
- Contribute: Allow
- Contribute to pull requests: Allow
- Create branch: Allow
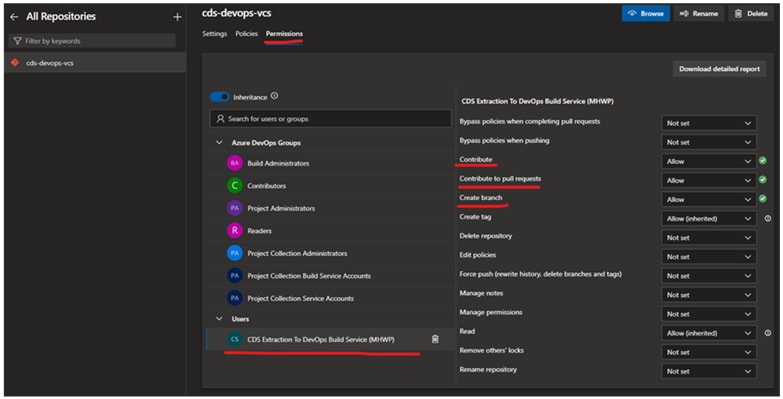
Select the Contributors group and give them the Force push permission. Without this, an administrator will be required to delete the branches created by your build service, even after the Pull Request has been completed. You can alternatively give this to an alternate group tasked with cleaning up your repo if you do not wish to give all developers this privilege.

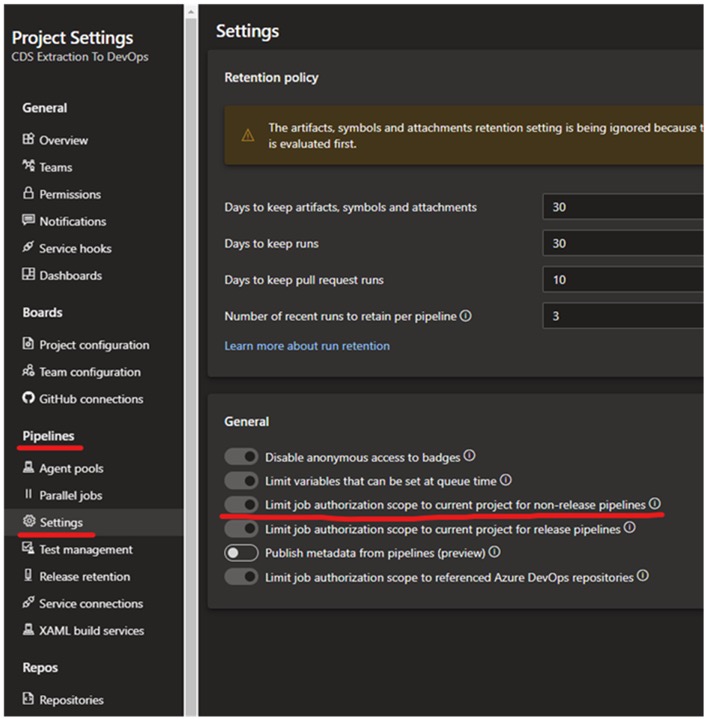
Now we need to ensure that the Build Service Account will be used for our build definitions. This can be done by navigating to your Pipelines Settings and ensure that the General setting “Limit job authorization scope to current project for non-release pipelines” is set. By default, this is on at the organisation level, but if your organization has this off by default it will need to be toggled on.
Install a Power Apps DevOps Tool Framework
We require DevOps tasks in order to perform the CDS Solution extraction. Whilst you can certainly script this up yourself or use the new Microsoft DevOps extension, we will be using Wael Hamze’s Power DevOps tasks to make our lives easier as it currently offers greater feature implementation, which can be installed from the marketplace here. If you are the administrator of your organisation you can install this directly, otherwise you will need your administrator to approve it.
Set up your CDS ALM account
Whilst you can certainly use your own CDS username/password for the pipeline, I highly recommend you set up an Application User account to perform Application Lifecycle Management operations without having to consume a license. The power apps guy has an excellent run through of creating such a user here.
Either way, you will need to assign the user suitable Security Role privileges in order to export solutions. Assigning a non-interactive account System Administrator has security implications. I would suggest cloning the Common Data Service User role and granting it the “Export Customizations”, “Import Customizations” & “Publish Customizations” privileges under the “Customization” privilege group.

Tying it together in DevOps with YAML Build Pipelines
In practice I have found the classic editor has issues with correctly passing the Azure DevOps Personal Access Token to the Azure CLI tasks, and thus typically use a YAML file for my extraction pipelines.
Create a new YAML Build pipeline, targeting Azure Repos Git
Step 1

Step 2

Step 3

A minimal pipeline is shown below. An excellent resource to have open when working with YAML pipelines is the schema located here.]
# Example CDS Extraction Pipeline
# Will Create a new branch, extract CDS to it, push it back to DevOps from the agent, and create a PR
variables:
- group: 'CDS Extraction'
- name: MajorMinor
  value: '1.0'
- name: CdsConnStr
  value: 'AuthType=ClientSecret;ClientId=$(CdsClientId);ClientSecret=$(CdsClientSecret);Url=$(CdsUrl);'
pool:
  vmImage: 'windows-latest'
name: $(MajorMinor).$(Build.BuildID).0
trigger: none
steps:
- checkout: self
  persistCredentials: true
- task: MSCRMToolInstaller@12
  inputs:
    nugetFeed: 'official'
    psFeed: 'official'
    configMigrationVersion: '1.0.0.53'
- task: PowerShell@2
  inputs:
    targetType: 'inline'
    script: |
      git config --global user.email "devops@withprecision.com"
      git config --global user.name "DevOps Automation"
      git switch -q -C "extract/$(Build.BuildId)"
  displayName: 'Create Branch'
- task: MSCRMExportSolution@12
  inputs:
    crmConnectionString: '$(CdsConnStr)'
    solutionName: 'DevOpsExtractionSolution'
    exportManaged: true
    exportUnmanaged: true
    useAsyncMode: true
    outputPath: '$(build.binariesdirectory)'
  displayName: 'Export CDS Solution'
- task: MSCRMExtractSolution@12
  inputs:
    unpackedFilesFolder: 'Src/Solutions/DevOpsExtractSolution'
    packageType: 'Both'
    solutionFile: '$(build.binariesdirectory)\DevOpsExtractionSolution.zip'
  displayName: 'Unpack CDS to Git'
- task: PowerShell@2
  inputs:
    targetType: 'inline'
    script: |
      git add -A
      git commit -q -m "CDS Solution - Portal Extraction"
      git push -q --set-upstream origin "extract/$(Build.BuildId)"
  displayName: 'Push extracted branch back to devops'
- script: az devops configure --defaults organization=https://dev.azure.com/MHWP project="CDS Extraction To DevOps" --use-git-aliases true
  displayName: 'Set default Azure DevOps organization and project'
- script: echo $(System.AccessToken) | az devops login
  env:
    AZURE_DEVOPS_CLI_PAT: $(System.AccessToken)
  displayName: 'Login to Azure DevOps'
- script: az repos pr create --detect true --project "CDS Extraction To DevOps" --repository "cds-devops-vcs" --source-branch "refs/heads/extract/$(Build.BuildID)" --target-branch "refs/heads/master" --description "Automated CDS Extraction"
  displayName: 'Create CDS Extraction Pull Request'
We’ll break the build pipeline down into sections.
Variables
variables:
- group: 'CDS Extraction'
- name: MajorMinor
  value: '1.0'
- name: CdsConnStr
  value: 'AuthType=ClientSecret;ClientId=$(CdsClientId);ClientSecret=$(CdsClientSecret);Url=$(CdsUrl);'
In the variables section we define a few basic values to define the build number and to construct our CDS connection string. (In this regard I like to use Wael Hamze’s Tools as they do not require configuring a service connection in DevOps).
We have defined a variable group called “CDS Extraction” in DevOps to house our CDS configuration, including the Url, ClientId and Client Secret of our CDS Application User app registration. We utilise a variable group as it is important to keep the client secret properly secured, which can only be done via variables groups when using YAML pipelines.

As you can see from the “CdsConnStr” variable, the general syntax for referencing variables is $(VARNAME).
Git & Tools Initialisation
variables:
steps:
- checkout: self
  persistCredentials: true
- task: MSCRMToolInstaller@12
  inputs:
    nugetFeed: 'official'
    psFeed: 'official'
    configMigrationVersion: '1.0.0.53'
The first couple of steps instructs the pipeline to check out the targeted branch (in this case, master of the cds-devops-vcs repo that contains our customisations) and importantly, telling git to persist the credentials, which will ensure the pipeline is able to access the access token in order to push changes back to the repo/create the pull request.
The Tool Installer is a Power DevOps task that installs some pre-requisites into the build agent. The Configuration Migration powershell utility that the tool relies on, available here, can at times be unstable, I would recommend finding a working version (.53 at time of writing) and lock your task at a particular version to prevent un-necessary failures in your pipeline.
Branching Git
variables:
- task: PowerShell@2
  inputs:
    targetType: 'inline'
    script: |
      git config --global user.email "devops@withprecision.com"
      git config --global user.name "DevOps Automation"
      git switch -q -C "extract/$(Build.BuildId)"
  displayName: 'Create Branch'
The next powershell task is responsible for branching off master on the local build agent. It is important to set an email/name in the git configuration, as you will not be able to push back to the repo without one. The email does not actually have to resolve to an active email account, it is just for commit author identification purposes. I have named the new branch under a folder “extract”, tagged with the Build Id for convenient ordering and grouping.
Loading the CDS Solution into Git
- task: MSCRMExportSolution@12
  inputs:
    crmConnectionString: '$(CdsConnStr)'
    solutionName: 'DevOpsExtractionSolution'
    exportManaged: true
    exportUnmanaged: true
    useAsyncMode: true
    outputPath: '$(build.binariesdirectory)'
  displayName: 'Export CDS Solution'
- task: MSCRMExtractSolution@12
  inputs:
    unpackedFilesFolder: 'Src/Solutions/DevOpsExtractSolution'
    packageType: 'Both'
    solutionFile: '$(build.binariesdirectory)\DevOpsExtractionSolution.zip'
  displayName: 'Unpack CDS to Git'
We then use a couple more Power DevOps tasks to first extract the solution from our target environment, then run solution packager to insert it into our new git branch. I recommend exporting both an unmanaged and managed copy of the solution as this gives you more flexibility in building solutions with the solution packager. I also recommend running the export in async mode to minimise the chance of timeouts. The most important setting here is the ‘unpackedFilesFolder’ setting which is a path to where you want the files to map to, from the root of the repository.
Sending our new solution pack to DevOps for review
- task: PowerShell@2
  inputs:
    targetType: 'inline'
    script: |
      git add -A
      git commit -q -m "CDS Solution - Portal Extraction"
      git push -q --set-upstream origin "extract/$(Build.BuildId)"
  displayName: 'Push extracted branch back to devops'
We need to explicitly commit our extracted CDS solution changes onto our new local branch (at this point still on the build agent only). Whilst instructing git to create it as a branch on the origin (in this case our DevOps Git repository)
- script: az devops configure --defaults organization=https://dev.azure.com/MHWP project="CDS Extraction To DevOps" --use-git-aliases true
  displayName: 'Set default Azure DevOps organization and project'
- script: echo $(System.AccessToken) | az devops login
  env:
    AZURE_DEVOPS_CLI_PAT: $(System.AccessToken)
  displayName: 'Login to Azure DevOps'
- script: az repos pr create --detect true --project "CDS Extraction To DevOps" --repository "cds-devops-vcs" --source-branch "refs/heads/extract/$(Build.BuildID)" --target-branch "refs/heads/master" --description "Automated CDS Extraction"
  displayName: 'Create CDS Extraction Pull Request'
Finally we need to log in to the DevOps Azure CLI to create the Pull Request for developers to review for any errors / integrate back into the master branch.
The first task is responsible for targeting the correct DevOps project at login, the second retrieves the persisted Git credential from earlier and passes then to the Azure CLI to login.
The final script creates the pull request itself, note that you need to prepend your branch with its fully qualified Git reference, ie refs/heads/, along with specifying the target repository (A DevOps project can have multiple repositories).
Viewing the results
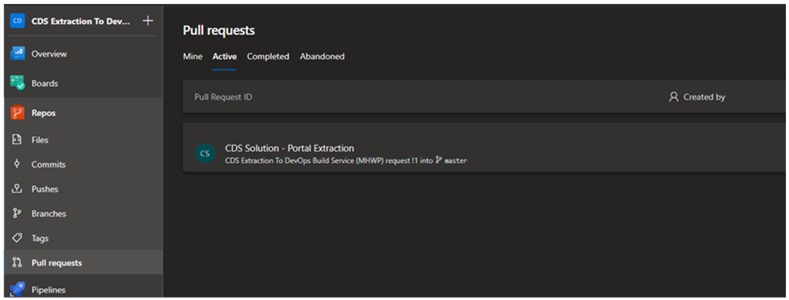
Finally we can view the active pull request under the Repos menu to verify we have correctly lifted the customisations out to the correct folder.

Conclusion
This approach provides a convenient basis for automatically exporting your configuration from an environment into DevOps, in preparation for them releasing to higher environments (ie UAT, Production). In practice I have extended this to include Portal configuration extraction and token substitution, which will be covered in a later post.
If you have any tips or tricks for building on the YAML or perhaps simplifying the Azure DevOps CLI login I would love to hear it!

Get In Touch


Contact Us
WP Global Solutions (Australia)
Get in touch | +61 (08) 6277 0201
Suite 1, 7 Henry St, East Perth WA 6004
WP Global Solutions (UK)
Get in touch
Suite 3799 PO Box 6945, London W1A 6US